Spring Cleaning – Computer Edition


First things first, I want to make a couple disclaimers. This post is to show you some easy ways to reduce clutter on your computer. It’s geared toward the casual user that has a fairly high comfort level with computer use. I have a home built PC with IT help in house and available via phone. I have a decent grasp on how this whole thing works, and what I don’t know I ask the experts. Do NOT do anything you’re not comfortable doing- including messing with pieces and parts of your inner computer workings. You’ll clog the tubes and the magic box will start smoking if you click the wrong things (not really, but if you’re pretty sure that’s how this all works this post is not for you). I cannot be held responsible for damages done to your computer or potentially finding files of a delicate nature on your computer. (ie- files that might be placed there by a significant other, teenager, curious monkey, etc… often with seemingly innocuous folder names (re: porn, I’m talking about porn))

Phew! That said, don’t be afraid to get rid of programs and files you don’t need or use. Let’s review some technical vocab before we get this post going so that you can refer back if you need.

VOCAB:

Desktop– the area of your computer from which you operate programs, the internet, music, etc. It’s the place you can change the background of to show your favorite picture, and the place where all your files are stored.

Icon- an icon is a picture that is linked to a program or file- ex: Skype is a blue bubble with a white ‘S’ in the middle

*click on the image to expand the view*

To begin, click the start button and open the control panel. Select ‘Programs’

1

Click on ‘Uninstall a Program’

1.5

This will bring up a list of all your programs.  It will look something like this:

2

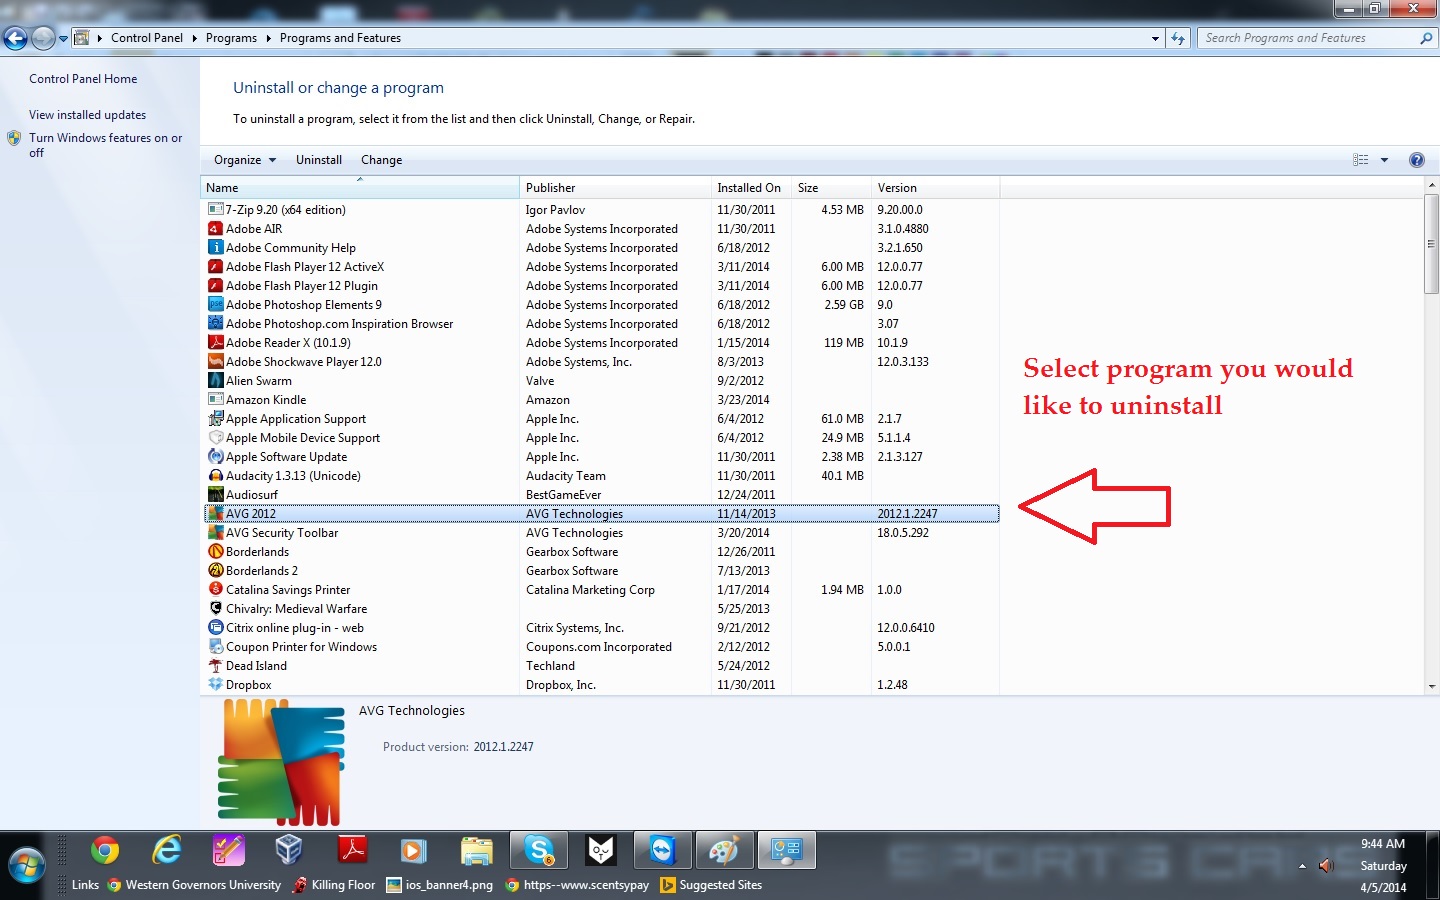
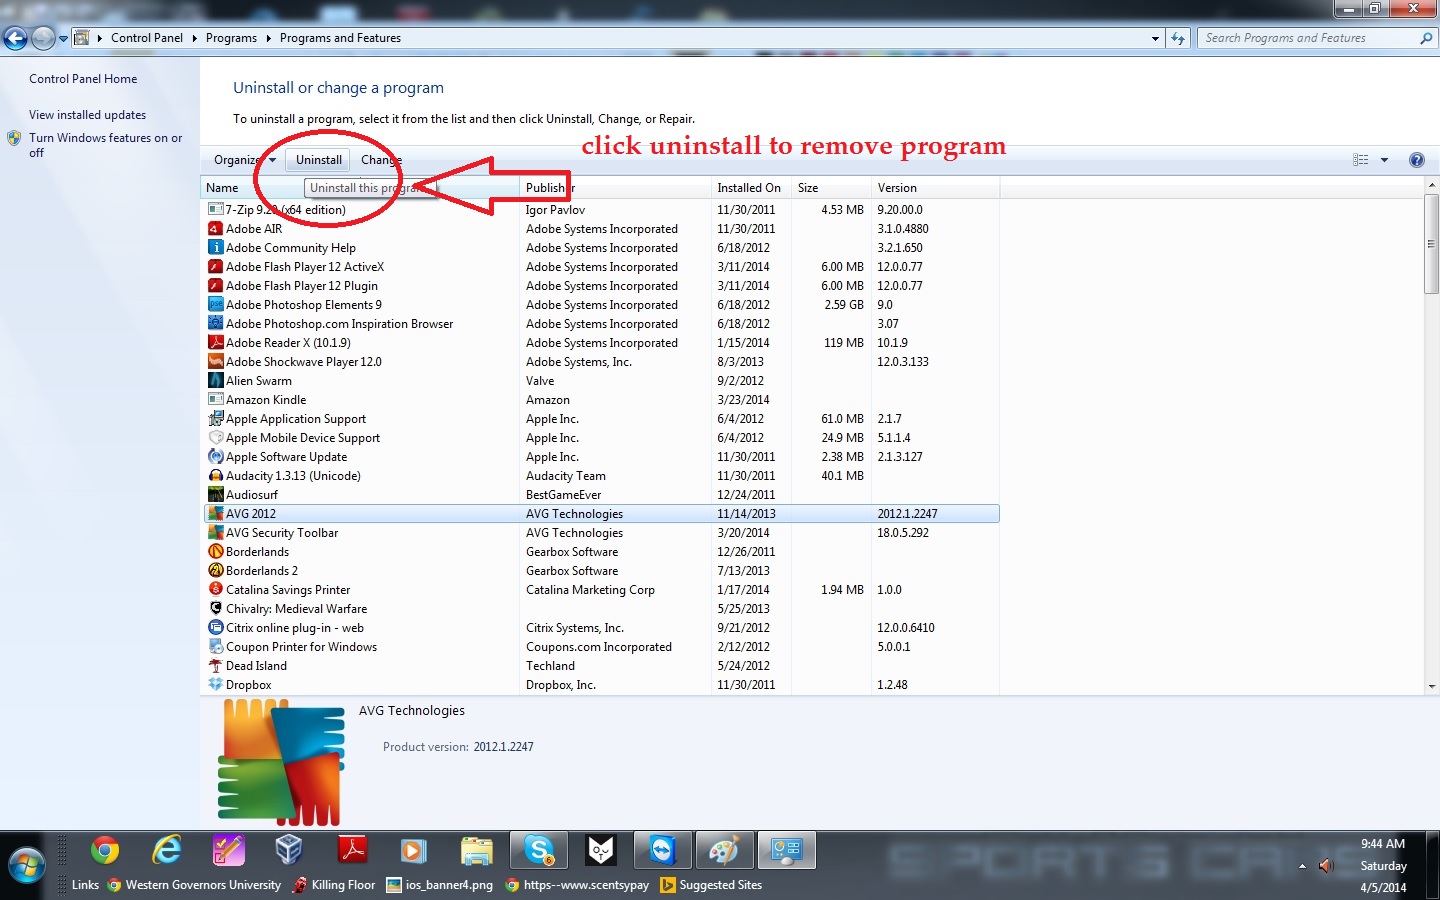
Select the program you wish to uninstall, and click the uninstall button at the top.

3

You’ll get different results depending on the program. Sometimes you’ll get a bar that shows the progression of the uninstall. Sometimes you’ll get a pop-up that will require you to click through the uninstall process.

4

Sometimes you’ll get a survey asking why you are choosing to uninstall the program.

6

Once you’ve finished clearing off the control panel of programs you don’t need, click on your computer and double-click on the C: drive to open.

7.

Select ‘Program Files’

8

Select the program you wish to delete. The program here are stored in files, you need to double-click the file of the program to open.

9

Find the ‘uninstall’ within the program file.

10

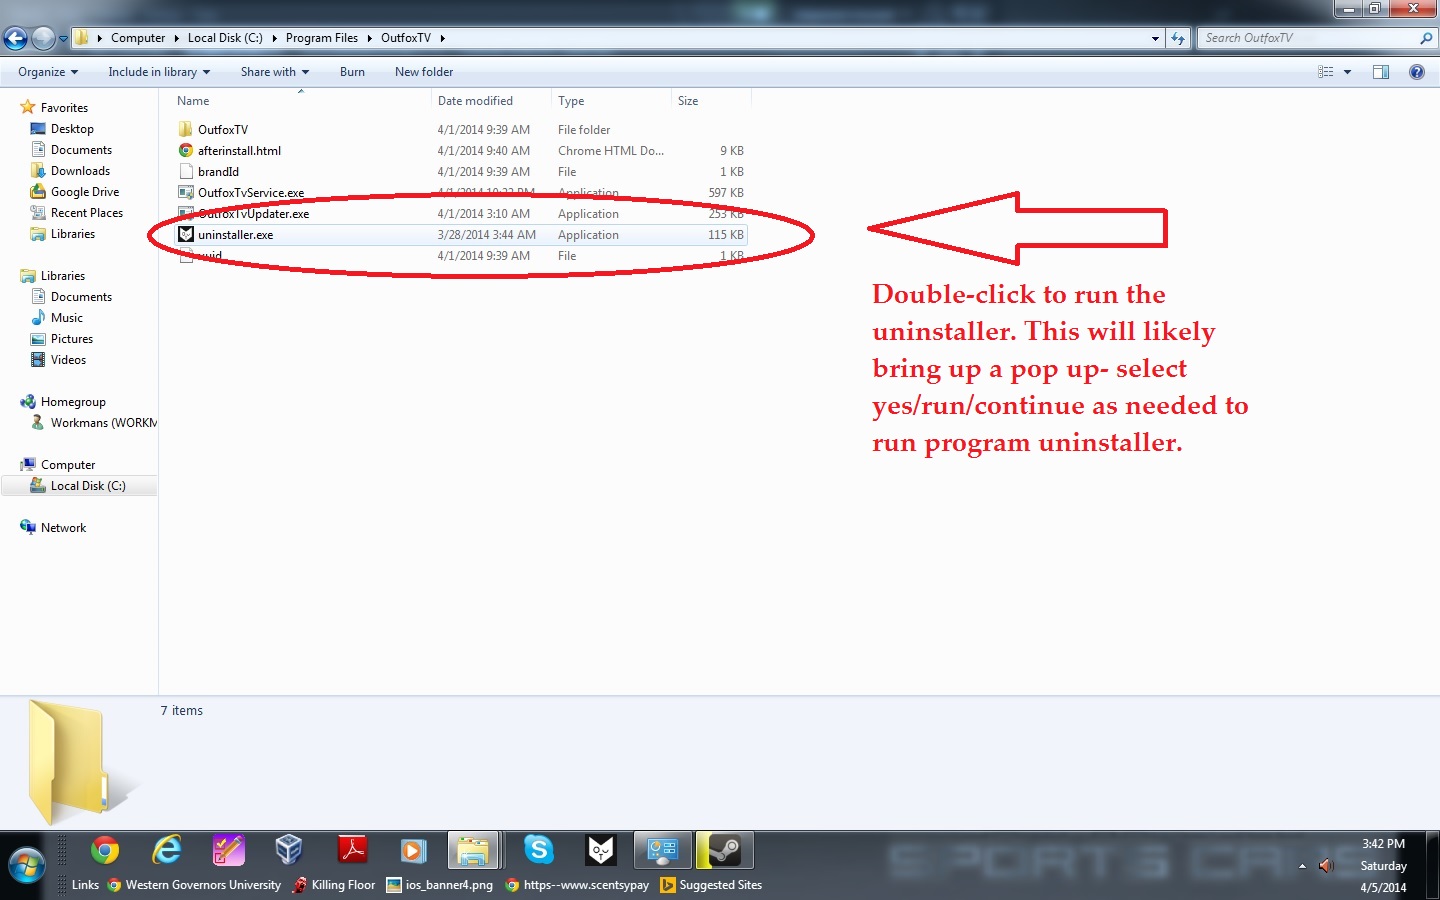
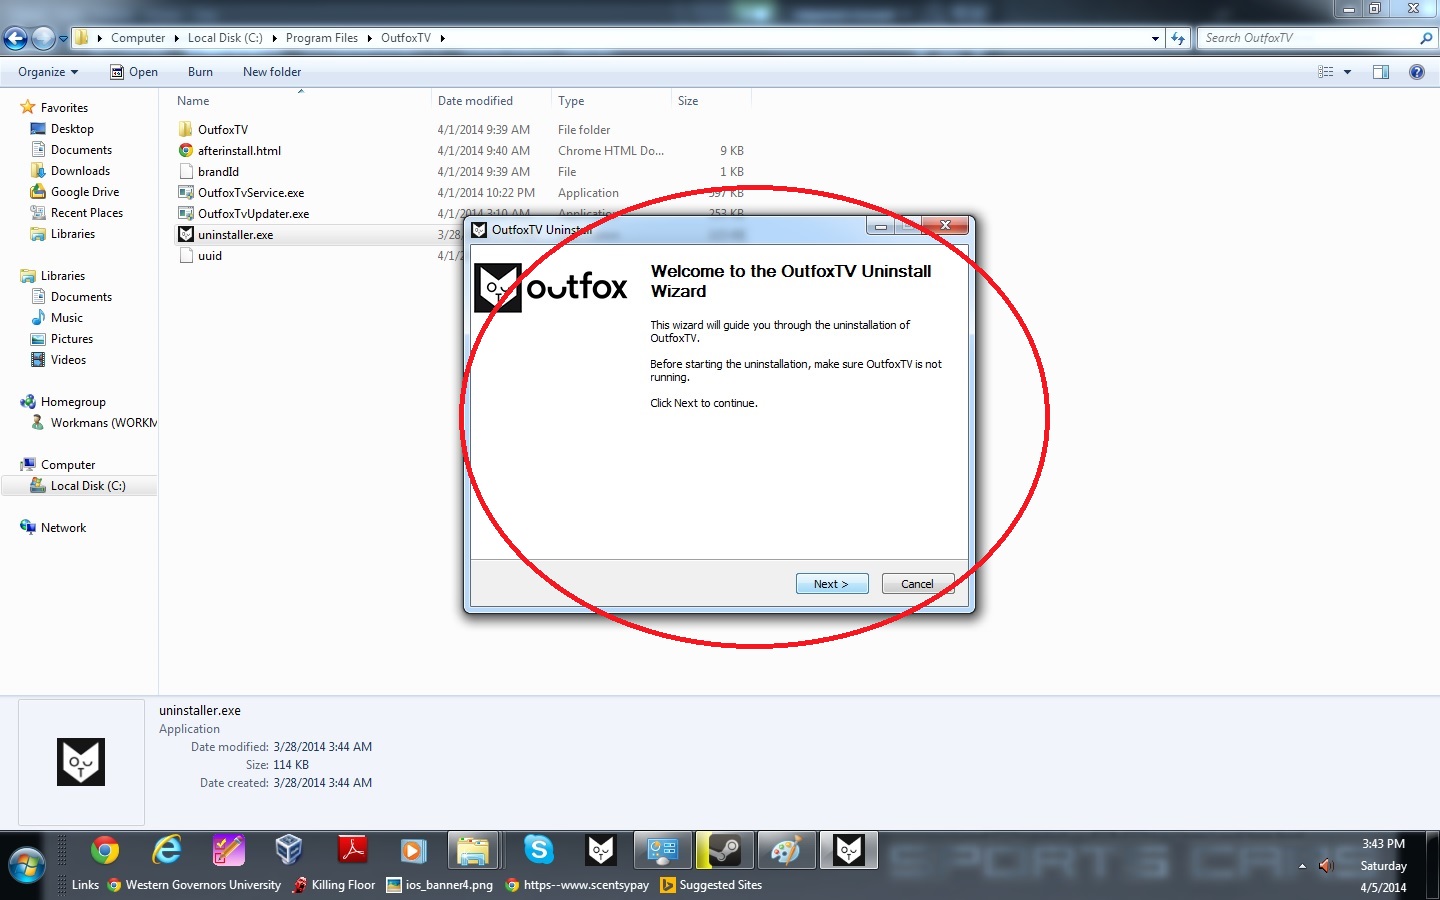
Double-click to run the uninstall. You’ll often get varying types of pop-ups with the uninstall here as well. Click through to uninstall the program.

11

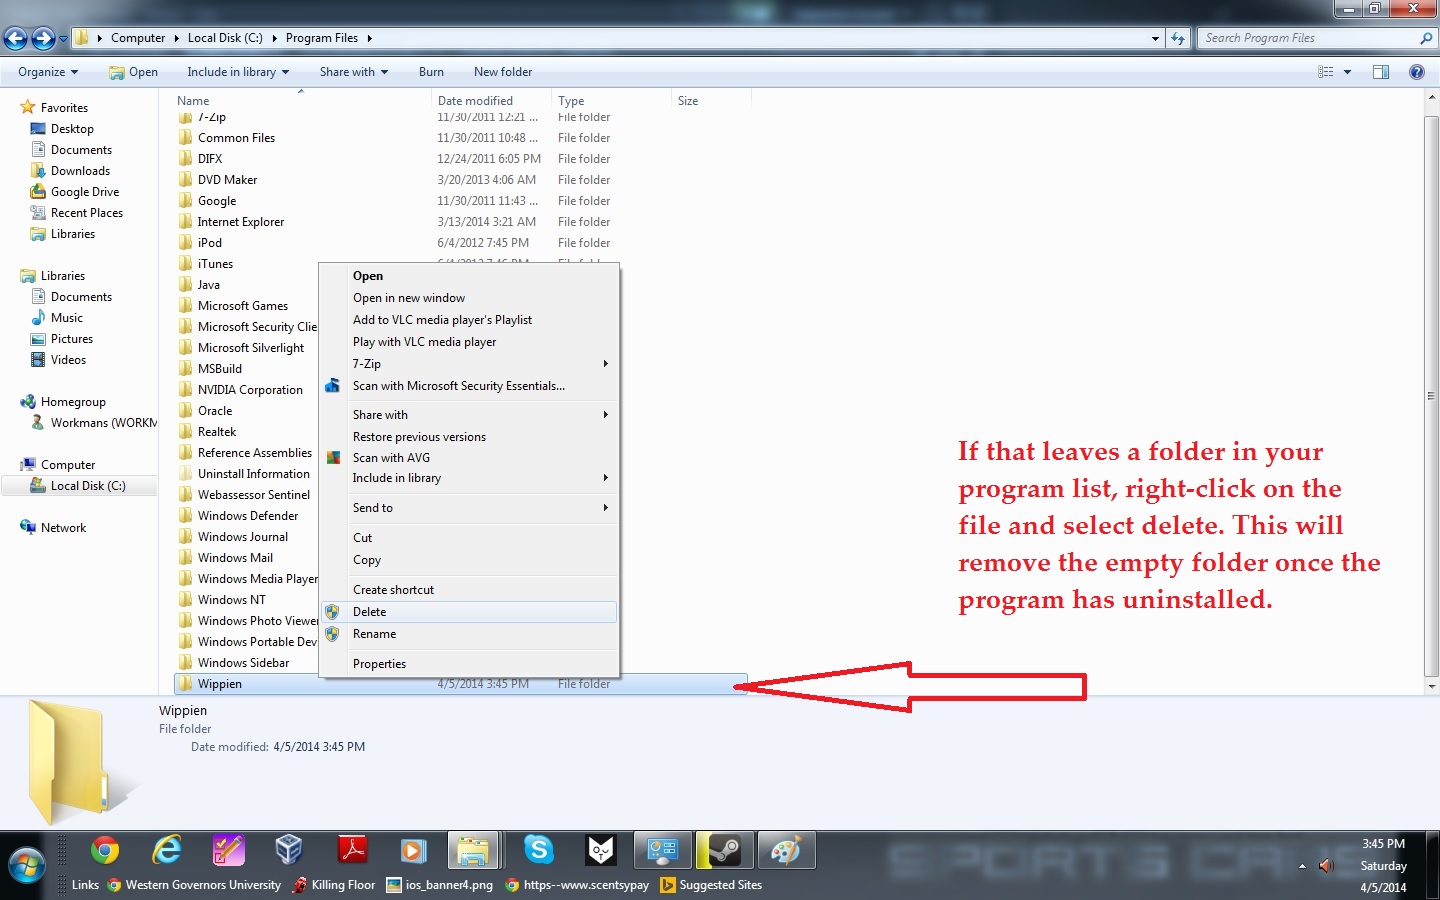
Sometimes the file path won’t be deleted when you remove the program. Simply go back to the program list and select the now empty file. Right-click and select ‘delete’ and this will remove the empty file.

12

Once you’ve cleaned up your programs, exit out of the control panel or C: drive. You’ll now clean up your desktop icons.

13

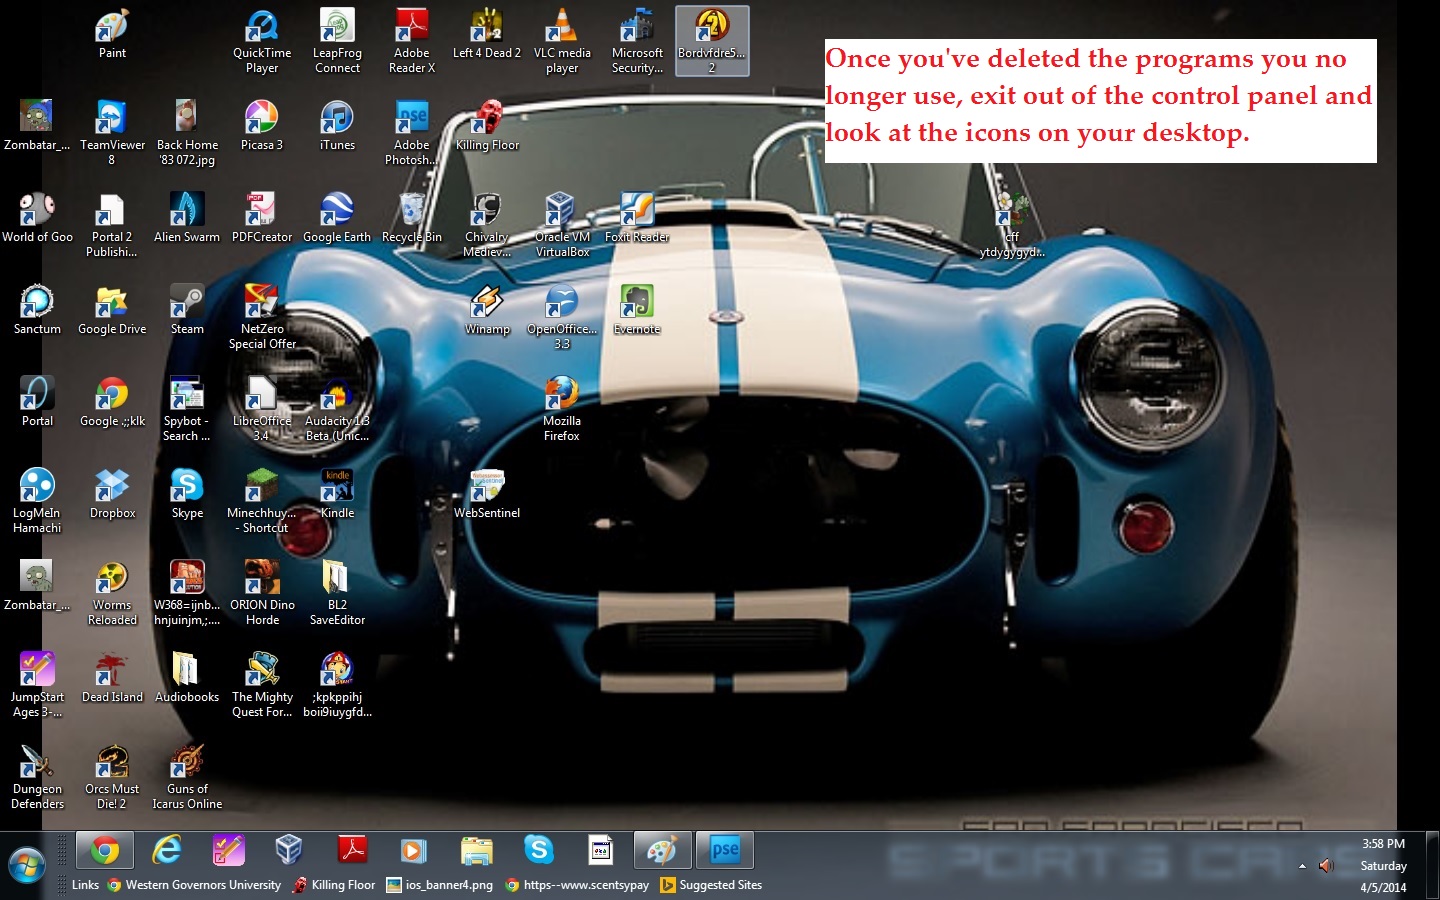
Start by dragging all the icons that you use frequently to the right, and all the icons for programs you hardly or never use to the left. Be sure to move the trash can icon to the middle- this is the recycle bin- the place where all your stuff goes before it’s completely deleted.

14

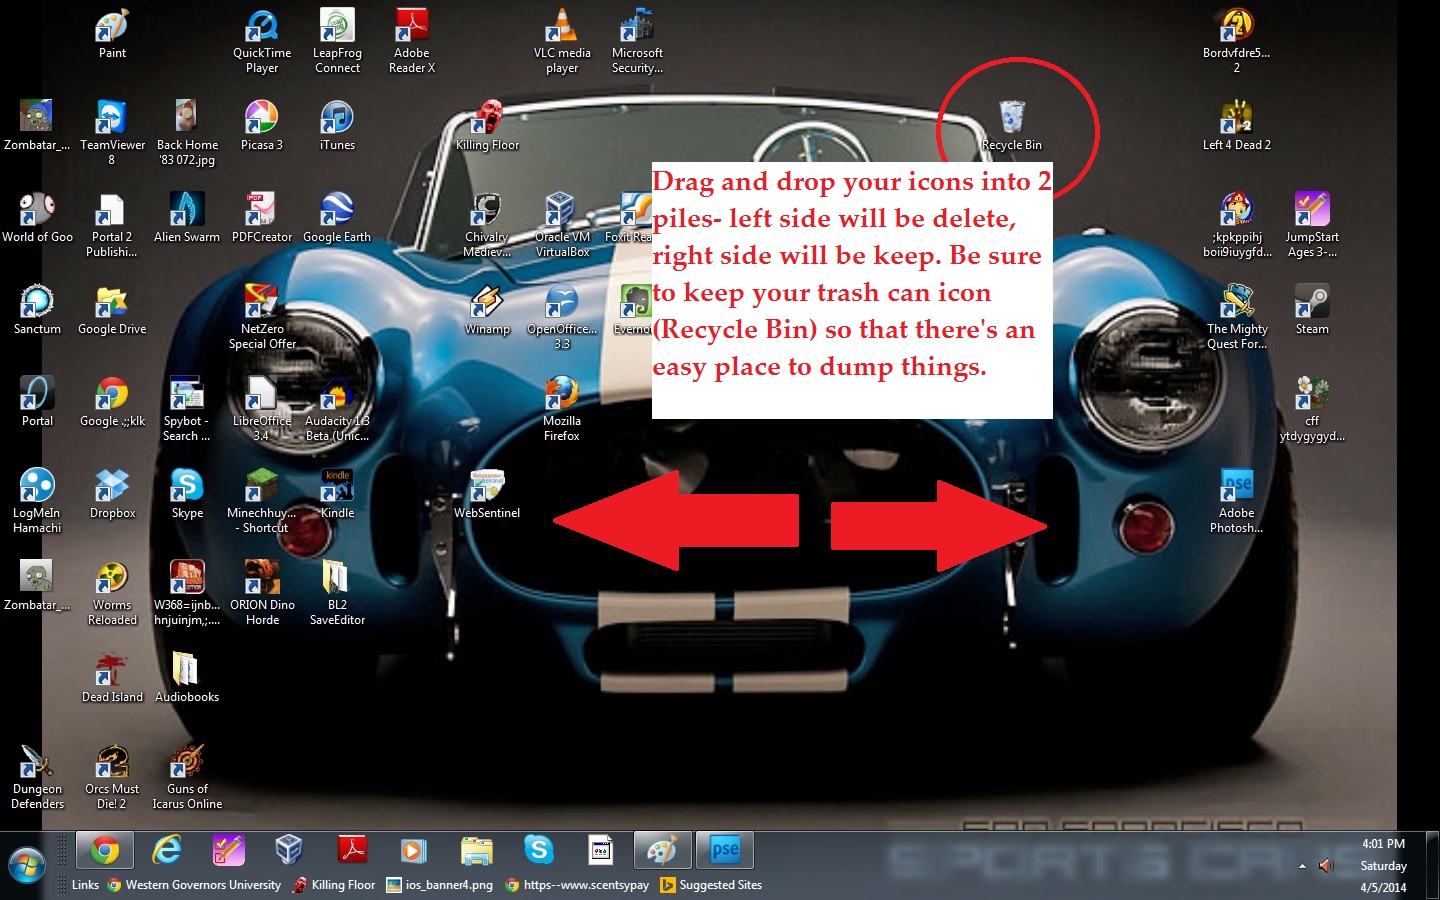
Once you’ve divided your icons, drag and drop them into the Recycle Bin. This will remove the icons ONLY. This does not actually delete the program. That is done in the steps as outlined above.

15

When you are finished clearing off your icons, right-click on the Recycle Bin and select ’empty’.

16

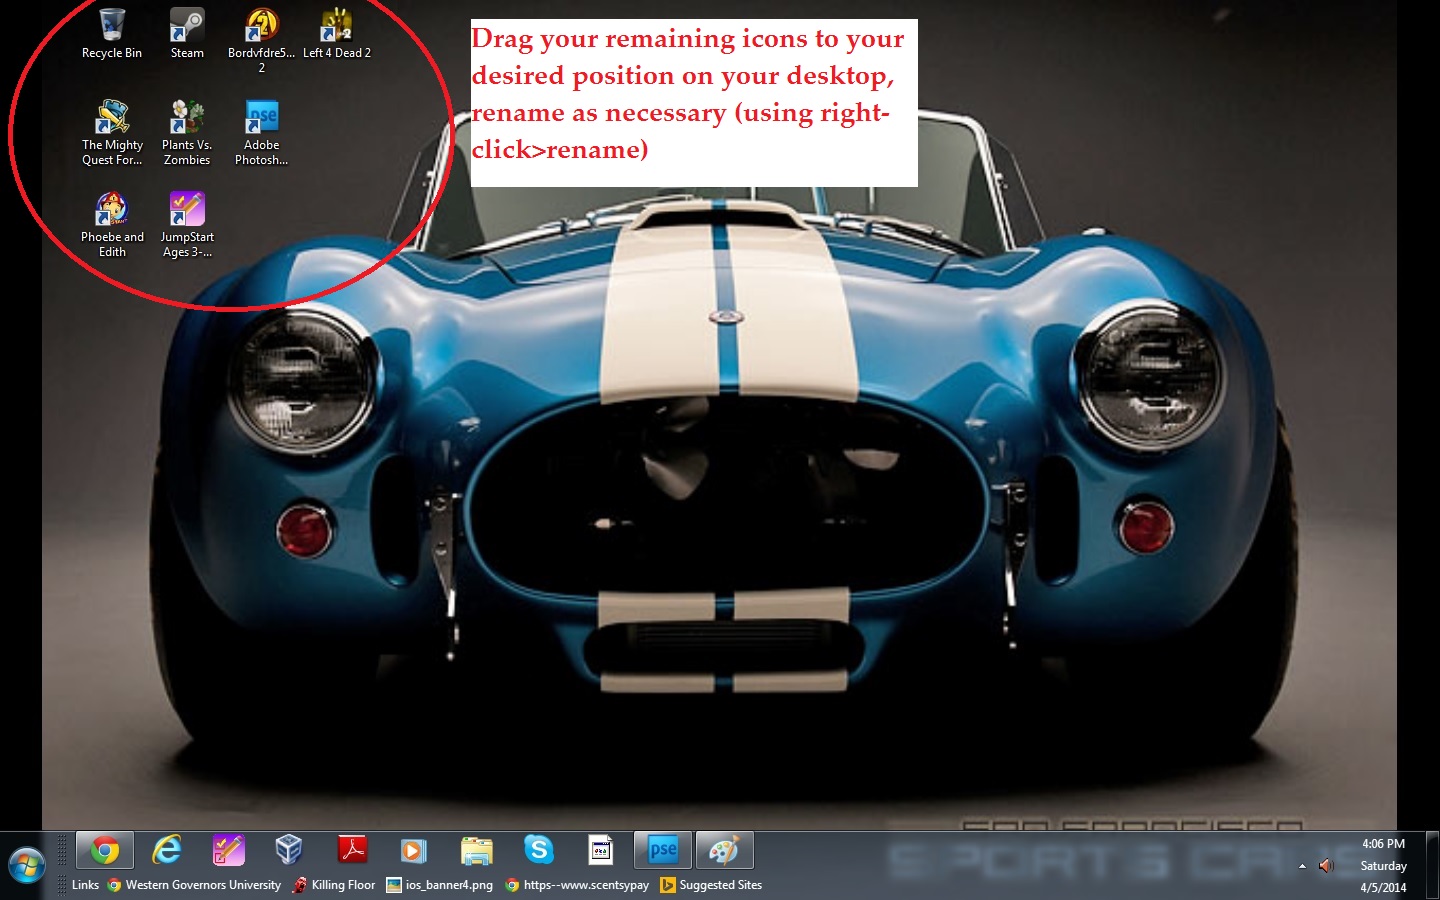
Move your frequently used icons to wherever you would like them. I keep mine either lined up on the left or in a group at the top left of the screen depending on the background I’ve chosen. I also find that I need to re-name most of the program since my children enjoy ‘typing’ on my computer often.

17


Finish up with a fun, springy picture (such as your children at the beach a couple years ago) and enjoy your clean desktop!

18

Tuesday Tips – Spring Cleaning Edition

So these aren’t specific to cleaning persay, but rather to organization and easy ways to do things.

1- Use a silverware drawer divider to store toothbrushes and toothpaste off the bathroom counter


20140403_173841[1]


2- Affix 3M hooks to the shower wall and place a open bottom plastic container on them to store toys and allow for water drainage.

20140403_173902


3- Attach 3M hooks to wall by most frequently used door and attach a basket to store often used items. (I put a plastic basket by our front door with sunscreen since our kids live outside in the summer. I put in both the face sticks and the lotion. It’s at kid height so that they can grab and bring it to us for application.)

20140403_173932


4- Use the large 3M hooks in a hallway to hang jackets, hats, scarves, etc. instead of a hat rack or coat closet. (We don’t have a coat closet- therefore this idea was born of necessity.)


5- In your office, by your most often used exit at your home, in your gym locker, attach a 3M hook to hang your keys on when you enter. No more lost keys!


6- Once a week take a mixture of vinegar and water, rubbing alcohol and water, or Clorox or Lysol wipes and wipe down remotes, phones, all the door handles in your house, all toilet levers, all light switches, and all knobs that are used often. This will help cut down the spread of germs. Be sure to allow surface to remain moist for 60-90 seconds to allow cleaner to kill germs.


7- Wash your oven racks/dogs/super muddy stuff in the tub JUST before you scrub the tub. If you can’t scrub right away, fill tub with warm water and some dishwasher detergent. This will soak off the grim and cut through the gunk. Be sure to spray down with vinegar and rinse when you have the time.


8- Vinegar is a GREAT cleaner and deodorizer. I had a dog a few years ago that peed INTO my laptop case (yes, with my laptop still inside of it) and made my case stink. I soaked the entire case in vinegar for a full day and it removed the smell. It was a lifesaver for my expensive laptop case.


9- Aluminum pans from the dollar store are fantastic for making bulk meals. These are great for giving at baby showers, when someone’s had surgery, for holidays and events, and just when someone needs a break.


10- To shred a large amount of chicken fast (freezer meals anyone?) toss the still warm breasts into your stand mixer with the paddle attachment. The juicy breasts will shred perfectly.

20140401_164121


Spring Cleaning- Oven Edition

So I can’t have a domestically focused blog without a week on Spring Cleaning, can I? I am not the worlds biggest fan of cleaning, but I like my house to be spotless (which never happens with twin 4-year-olds and an elderly American Staffordshire Terrier) so when spring cleaning comes around, usually on the first week we don’t have snow or frost watches for 7 days, I JUMP at the chance to have a totally spotless house, at least for a few hours.

This week, I’m kicking things off with cleaning my oven. Top to bottom. Inside and out. Heck, we even pulled the whole unit out and scrubbed behind it. (Seriously not as gross as you’d think, but I was so focused on cleaning I didn’t get any pictures.)

I took the entire day to clean the oven- I did little projects between the oven clean (like a load of dishes and folding some laundry, I’m a wild woman I tell ya…) and by the time I was ready to cook dinner, my entire unit was fresh and sparkly. My basic rundown of cleaning was as follows:

1- take out oven racks and put to soak

2- sweep out crumbly bits from bottom of oven, run a quick steam clean cycle (I have a Whirlpool glass top with a steam clean cycle, it rocks)

3- make a paste of dish soap and baking soda and slather the inside of my oven, allow to sit for 30-45 minutes

4- spray oven out with straight vinegar (in spray bottle), allow to soak for 30-45 minutes

5- wipe out oven

6- run final steam clean cycle to make sure I got every bit

7- while allowing mix to sit inside oven, scrape and scrub glass top

8- relax on the internet for a while, peruse Pinterest, make lunch (I think we had microwave burritos, we’re health fanatics here.)

9- take a short nap

10- remember the oven racks that are soaking are actually needed for dinner, go see how the soak worked, be amazed, take lots and lots of pictures of this

11- re-assemble the oven with racks, stare longingly at the oven and stove that now look ALMOST brand spanking new, sigh, begin cooking dinner

So that’s it- not a whole lot of actual scrubbing. The most labor intensive part was scraping the glass top, which I’d done not too long ago because the ring of crust really bothers me. I’ve provided pictures with my descriptions as I did each part so you can follow along and see just how well each thing worked. I get my ideas on cleaning from Pinterest, so I’ve also included the pins that lead me to having such a beautiful clean stove. Happy cleaning!


To begin: asses the damage, roll up your sleeve, and remind yourself that these are tested methods for the lazy so you really don’t have a lot to worry about. Take out those oven racks, knock off the crud (or don’t) and toss them into the bottom of your tub.

Image


I found this Pin that said to soak your racks overnight with dryer sheets and dish soap. I figured I’d let them have 7-8 hours from the morning until dinner so soak, so same thing. I will admit, I thought this was crazy. Dryer sheets in a tub with junky oven racks? Oh well, the good people of Pinterest are NEVER wrong, right?! I gave it shot.

Image


I filled the tub with hot water, enough to cover the racks (I check back randomly throughout the day and added water as needed), squirted some dish soap on top, and threw in like 8 dryer sheets- I just grabbed randomly and threw them in on top. We use the dryer bars now so I really rarely use dryer sheets and these have been sitting around for like a year untouched.

Image


While the racks were soaking I began my assault on the rest of the oven. I started with  a quick steam cycle, during which I cleaned the glass top. Not the worst it’s been, but not sparkly clean either.

Image


See, there’s some burnt on gunk on the ring of the burner.

Image


To start with, I found this Pin that I hadn’t tried before. I’ve used various methods, but this one smells yummy and worked better than the others. Start by pouring a cup of water on the top.

Image


Then, sprinkle on your homemade laundry detergent (although NOT in disc form, in the regular powdery form).

Image


Spread around the detergent and get out your razor blade scraper. I found mine at Dollar Tree in a 4 pack. I use them for TONS of stuff. (Usually scraping up stickers from places they don’t belong.) Just scrape the gunk off. Don’t scrape so hard you scratch, but don’t be afraid to go after the gunk too. (*Do this at your own risk- I cannot be held responsible for damage done to your cook top- but I didn’t have any issues*)

Image


Repeat the spreading and scraping until it’s all clean. Wipe up the detergent with a wet washcloth. Finish everything up with some vinegar and a coffee filter- you’ll get a streak free shine.

Image


It’s so pretty I can see my knobs in it- hehe that sounds dirty.


Image


For some reason, I can’t find the pictures of cleaning the inside of the oven. Basically, just make a paste with dish soap and baking soda and slather it on. I let this sit for a while, then go back and spray it all down with straight vinegar. It gets all bubbly and fizzy and then it sits and gets and the gunk off. I let that sit for a while also. After a while, I go back with a scrubber and scrub it all down, making sure you get all the burnt on gunk off. Then wipe it out with a damp washcloth. I then do another steam cycle and wipe it all out again. That’s it. No nasty oven cleaner. Not a lot of scrubbing. No scraping or anything harsh for the inside. Just time and natural ingredients.  Here’s some Pinspiration for this- with actual pictures.


Once your oven is done, pull it out and clean behind. This is good to do several times a year to make sure you don’t have crumbs and stuff that pests like mice and roaches enjoy. Wipe down the wall behind and the walls or counters on the sides. Sweep and mop the floor. Plug your stove back in and shove back into place.


When you’ve allowed your racks to soak (overnight is great, but again, all day works just as well), go back and prepare to be amazed. You don’t need to bring scrubbers or scrapers for this part, you’ll use the dryer sheets to wipe them down.

Pick your rack and a dryer sheet and start wiping down. Seriously this is strangely satisfying and totally blew my mind. The caked on gunk literally just wiped away.


BEFORE:


Image

AFTER:

Image


This is a side by side comparison of the clean one and the dirty one. Seriously, no scrubbing. Just wiping. When I felt like one dryer sheet was too yucky, I just dropped it and picked up a new one.

Image


Look at how shiny and clean!

Image


Once this is done, you’ll want to clean your tub for sure. I just scooped out all the dryer sheets and tossed them and then drained the tub. I then sprayed on my cleaner and let it set, scrubbed a bit, and then rinsed the tub.

Replace your oven racks and relish in the fact that your oven/stove is sparkling and you’re done with that dirty little task for a while. Then get to making dinner and messing it all up again.


20140331_162958

Pinterest Picks – Easter

Here are my favorite Pinterest Picks for Easter.

1- Strawberry “carrots”

2- Neighbor gift

3- Centerpiece

4- Glow in the Dark Egg Hunt (I totally want to try this this year!)

5- Cinnabunnies for Easter breakfast

6- Homemade Gift Bunny Tails

7- Easter Activities for Toddlers

8-  Egg Salad ‘Carrots’ for Easter lunch

9- 50 things to put in plastic eggs that aren’t candy

10- 100 Easter treats


I hope this week has inspired you to get ready for Easter and given you some ideas on how to have a fun and economical holiday!

Easter Egg Decorating

So I’d planned on doing some string eggs but I didn’t have enough glue, time, or motivation to get them finished. I made a couple and wasn’t happy with them. Instead, I’ll share some of my favorite ideas for decorating your eggs.

1- Sharpie Eggs

sharpie


2- Decoupage Eggs

decoupage


3- Different Decoration Methods

different


4- Ombre eggs and more

ombre


5- Marbleized Eggs

marble


6- Melted Crayon

a


7- Tattoo Eggs

tattoo eggs


8- These are the Eggs you’re looking for

star wars


9- Whipped topping marble eggs

cool whip


10- Glittered Eggs

glittered

Easter Egg Wreath

I love the Easter wreaths and spring wreaths that you can find on Pinterest. I knew I wanted to do something along the lines of a plastic easter egg wreath. I also knew I didn’t want to spend an arm and a leg getting materials to do it.


Thankfully I had some pool noodles left over from the truffula trees I’d made for the girls 3rd birthday. They’ve been floating around the house since and I”m just getting around to doing stuff with them. One noodle (well, part of one) became the wreath base, I had the tape, glue, and scissors. I also had the eggs, they’re from my purchased from last years sales. In that, I had the grass as well. The pink ribbon is left from the girls birthday wreaths this year (Fancy Nancy).

20140328_103219

Cut your noodle to the size that you want the wreath to be. Secure the ends together with a strong tape. Duct tape works great, I could only find packing tape so that’s what I did. It worked just fine.

20140328_105256

Next, start hot gluing on your eggs in whatever order you want them. It think it would be really cute to do just a blue and orange one for your favorite Bronco fan. I’m going to be watching for eggs after Easter this year for that project! You will probably have to hold your egg on for a few seconds after you put the glue on until it cools enough to stay.

20140328_110124

Once you have the whole wreath done, it will look something like this. Remember, you only need to glue on the front since that’s the only side you’ll see.

20140328_111427

I’ve seen people that leave them like this and I think it looks fine, but mine felt too sparse. I added in some bits of Easter grass to fill in the gaps. Working slowly, put a little glue in each gap- doing no more than 3 or 4 gaps at a time so you have time to put the grass on before the glue cools.

20140328_135641

Stuff the grass down into the hot glue.

20140328_135659

I used a wooden dowel, but you can use anything that would be good for poking and tucking to gently shove in all the grass.

20140328_135721

When you have all the grass done, trim off any extras and pokey outs.

Add a ribbon and bow (or however you want to hang it) and display where you desire.

20140328_142706

I’m still not convinced this is finished. I love words on wreaths so I’ll probably put on a little sign that says ‘Happy Easter’ or something on the bottom near my little bunny. (Which was a random addition- I found a box of stuff my Grandma had given me. This bunny had floppy legs in a red gingham pattern that just didn’t fit with the colors so I cut them off. It also had a Goodwill tag on the bottom, so I knew it wasn’t a family heirloom or anything.)

20140328_142711

Tuesday Tips-Easter

Here are the best tips that I can think of when it comes to celebrating Easter…

1- When dying eggs with kids, especially little kids, use a whisk to hold the egg. They can then just dip  the whisk into the cup of dye and not get their hands all colored.

2- Temporary tattoos make great egg decorations. Better yet, the kids can add them on themselves (or ON themselves).

3- Buy your egg dye kits when they go on sale AFTER Easter. The little dye pods won’t loose anything, and you can get a kit for around 10¢.

4- Buy Easter decorations from your favorite craft store AFTER the holiday as well. Put them with all the other fun stuff you find. I typically only add 1 thing a year since I choose to go when they discount is beyond 70% off and there’s not a ton of stuff left. Last year I snagged an Easter tablecloth.

5- This was mentioned yesterday, buy toys and trinkets on clearance throughout the year or on after holiday sales. Even Christmas stuff is fun if you add cute stickers.

6- When stuffing plastic eggs for an egg hunt, avoid chocolate and candy- they melt and chances are your kids will get other candy from friends and family. Opt for things like a treasure hunt, small accessories like earring and necklaces, stickers, temporary tattoos, loose change, small toys like army men that you can buy a package of and divide into the eggs, and even treats like Goldfish crackers. The kids get all the fun with none of the sugar!

7- Buy Easter dresses a year in advance if possible. Sometimes it’s hard to judge size. Last year I made my ladies their dresses. This year they’re using ones that were given to us by a family member, I think she found them at a yard sale. Otherwise, this is another GREAT used item (think consignment shop) or clearance item.

8- Think outside the box on basket stuffers. If you’re dead set on those pre-made baskets then by all means, go ahead, but I think you can get better stuff for less with a little creative shopping. I don’t like to buy holiday specific items for any holiday. Easter stuff is cute and all, but for us, as soon as a holiday is done, we’re looking forward to the next big event- birthday or holiday or whatever. If you stick to generic stuff, they don’t get outdated easily. Craft supplies, art supplies, books and bubbles provide year round fun and all without adding more stuffed animals to your menagerie.

9- Movies are GREAT basket stuffers. We like to put in movies that the whole family will love. The first year, the girls got some Disney movies. For Christmas this past year they got the Croods. These are wonderful items to snag on Black Friday if you want to keep them tucked away (otherwise they make great stocking stuffers).

10- Don’t stress out and don’t get sucked into spending too much money. I honestly can’t remember specific items from any of my Easter baskets growing up. I DO remember spending time with my family, the egg hunts, and just having lots of fun. Time with family and friends is ALWAYS better than ‘stuff’.